Ledger Hardware Wallet
The Namada Ledger app is now available on the official Ledger Live app catalog! If you had followed the instructions on previous versions of these docs to install the development version from Zondax Hub, make sure you uninstall any pre-release versions of the app and install the latest version from Ledger Live before proceeding.
Both the Namada Keychain browser extension and the Namada CLI are compatible with the Ledger (opens in a new tab) hardware wallet. This guide will walk you through the process of setting up your Ledger device to work with Namada.
Prerequisites
You will need a Ledger device with the latest firmware installed. You can find instructions on how to update your firmware here (opens in a new tab).
In order to use the Ledger with the web wallet, you will need to install the Namada Keychain Extension. To use the Ledger with the Namada CLI, you will need to install the latest version of Namada.
Installing the Namada Ledger app
The Namada Ledger app is available on the official Ledger Live app catalog. Follow the instructions below to install the app on your device.
Connect your device to your computer
The remaining steps assume you have already completed the initial Ledger setup and your device is ready to use.
Open the Ledger Live App Catalog
Open the Ledger Live desktop app and select 'My Device' from the lefthand menu to display the list of available apps.
Install the Namada app
Scroll down until you find Namada in the list (or use the search bar), and click the 'Install' button to install the latest version on your device.
Using a Ledger with Namada Keychain (browser extension)
You can use the Ledger app with the Namada Keychain browser extension to sign transactions in front-end web apps. See the Namada Keychain page for instructions on installing and using the Namada Keychain browser extension.
Disclaimer: this will only work on Chrome-enabled browsers at the moment.
Importing (deriving) your Ledger address
Before any other operations with the Ledger, we will want to derive an address and public key and add them to the extension (web wallet) under an alias for convenience. To derive your address using a Ledger:
Open Namada Keychain and click Add keys
Click Connect hardware wallet
Connect your device to your computer and Open the Namada app
Follow the prompts and click Next after each step
Confirm on device
After the following the prompts, your address and public key will be displayed on your device. Confirm the operation on your device.
Name your Ledger account
Give your account an easy to remember name.
Click Finish setup
Display your address/public key
To display your Ledger address/public key, first open Namada Keychain. Find your Ledger account in the list, click the ⋮ icon (three vertical dots) and select 'View keys'.
Staking using the Ledger
You can use the Ledger to sign a transactions from a front-end app (such as Namadillo). The example given below is for staking with a validator (or validators), but the signing process is essentially the same for any type of transaction you wish to make (transfers, voting on governance, etc.)
The following assumes you have completed the steps to install the Namada Ledger app, the Namada Keychain browser extension, and completed the initial setup process as described in Importing (deriving) your Ledger Address above.
Open the web app
In your browser, open Namadillo (opens in a new tab).
Connect the browser extension
Click the 'Connect Keychain' button in the top right corner and approve the connection request.
Navigate to the staking dashboard
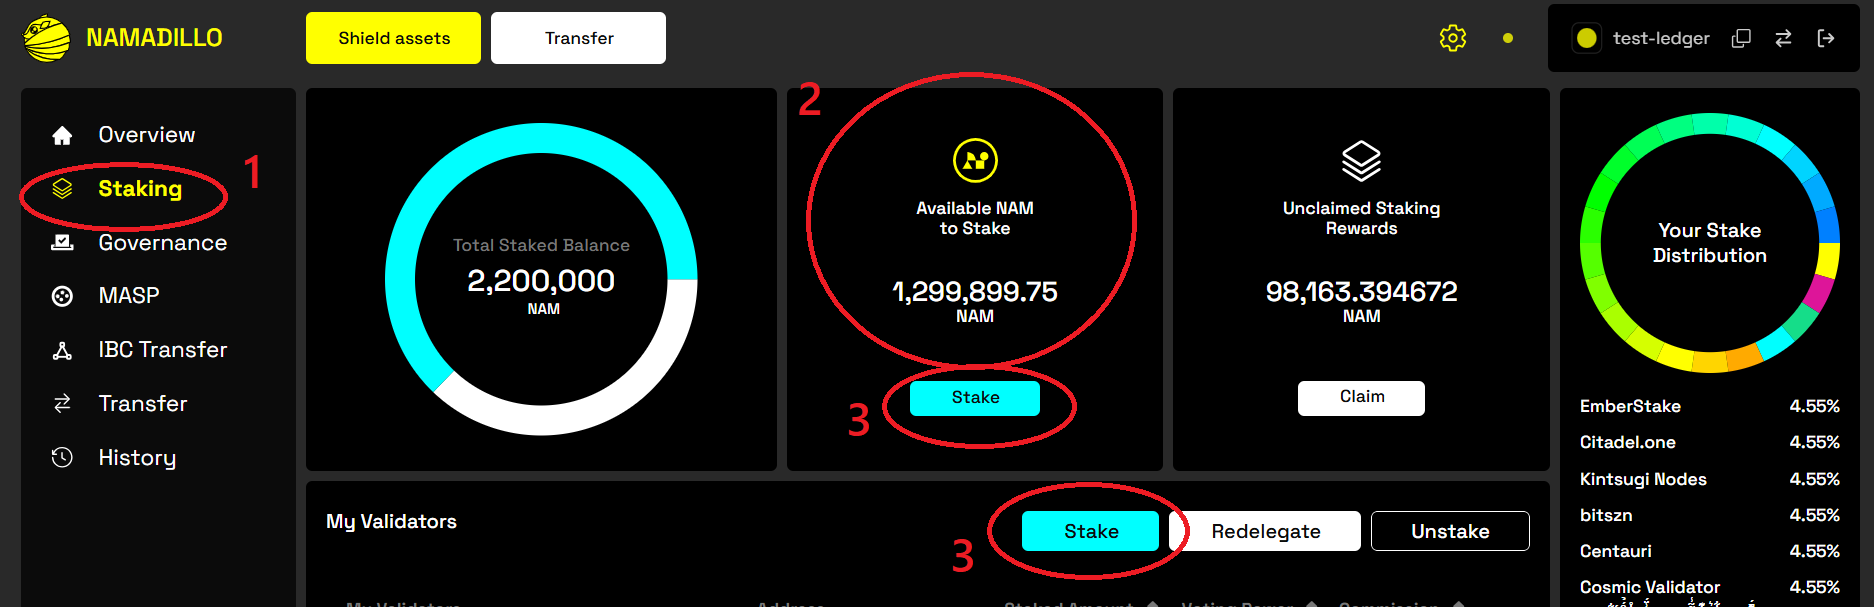
From the left panel, select 'Staking' (1, below). You should see your available NAM balance displayed in the top-center, under 'Available NAM to stake' (2, below).
(If your balance is different than expected, check that the correct account is active in the browser extension).
 Namadillo Staking dashboard
Stake your tokens
Click on 'Stake' (either button marked 3, above); this will open a new dialog in which you can enter the amounts you wish to stake with each validator (4, below).
You can stake with multiple validators in a single action. Click 'Stake' again (5, below) when you're ready.
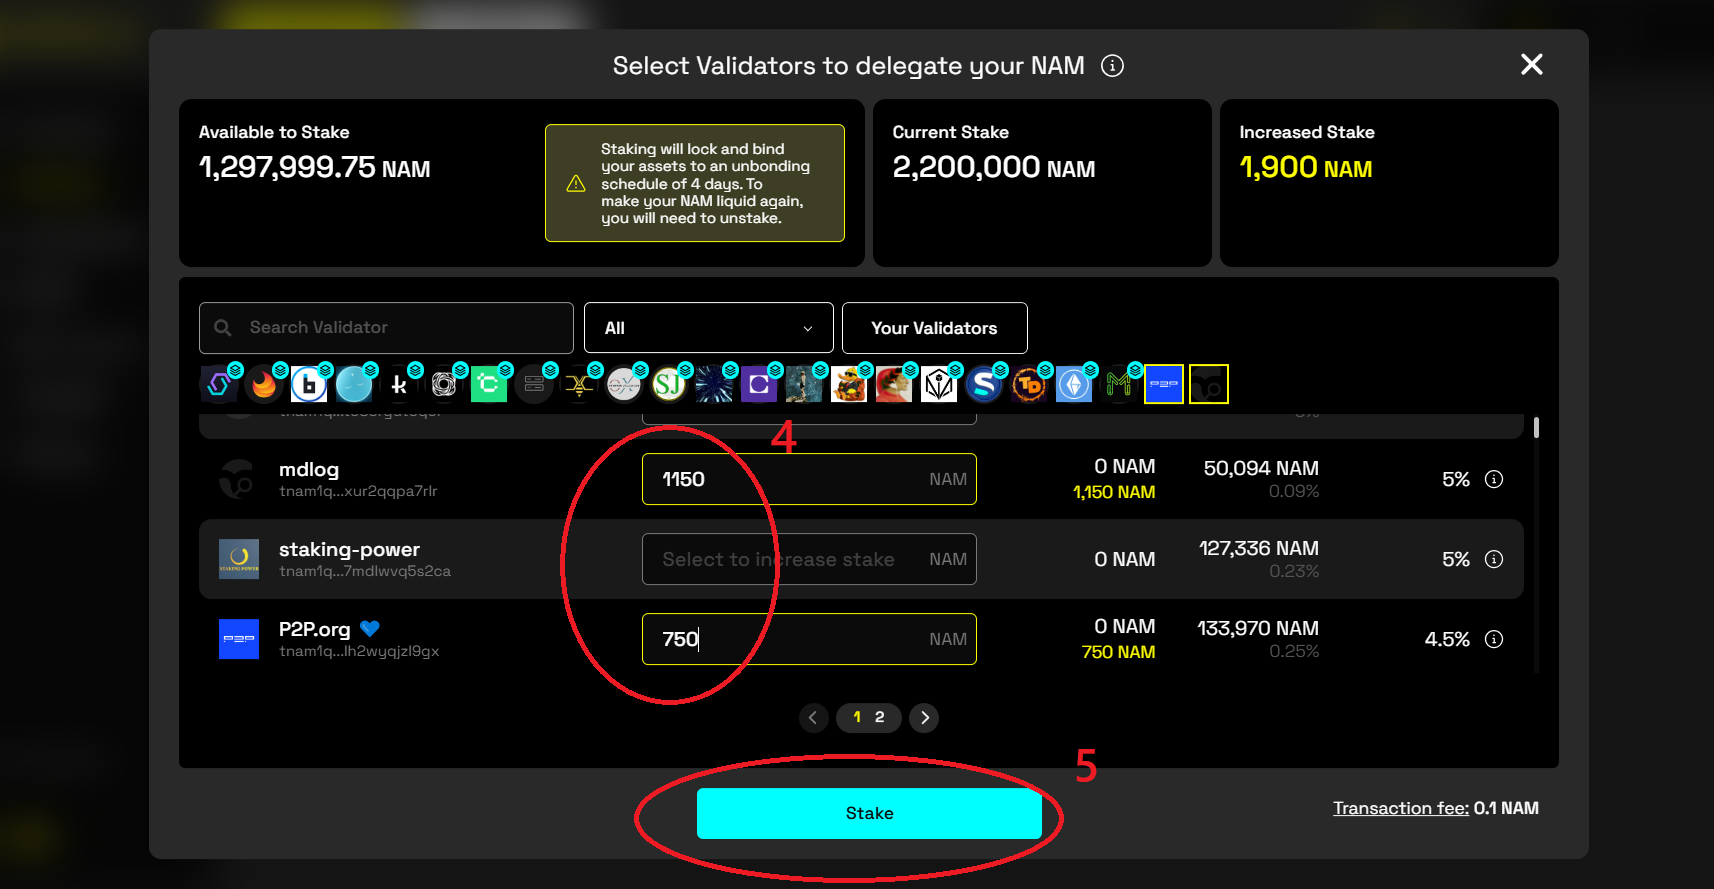 Staking to multiple validators at once
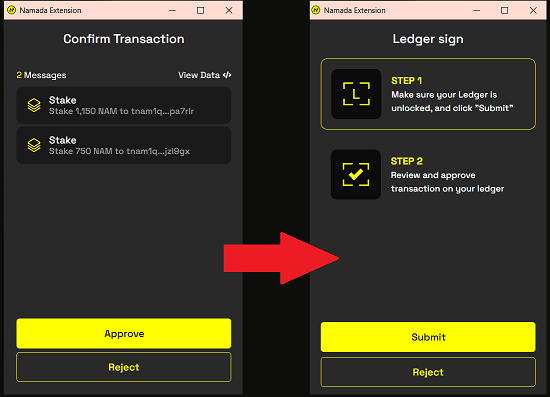
Approve the transaction
You will be prompted to approve the transaction in a pop-up. After confirming, you will also be asked to confirm the transaction on your Ledger device.
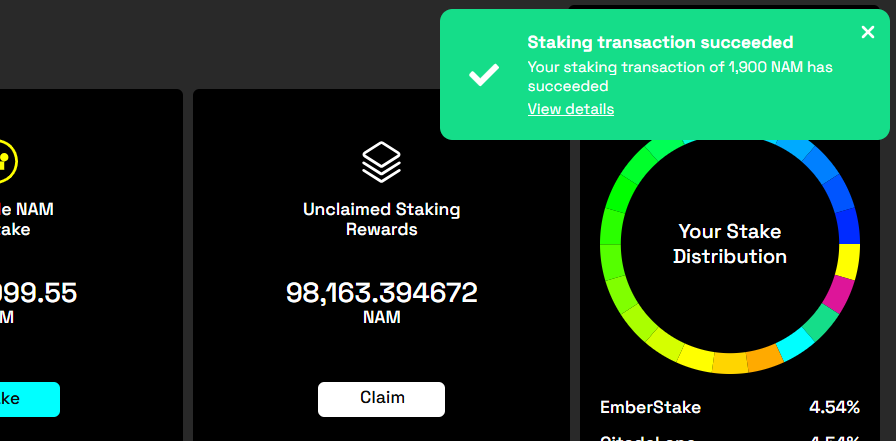
Wait for confirmation
You will see a grey dialog box in the top right corner of Namadillo notifying that the transaction is being processed. After roughly 10 seconds you will be informed
if your transaction was successful.
Worth noting:
Whenever you're submitting a transaction of any kind for the first time from an address, you'll also see a 'Reveal PK' (Reveal Public Key) transaction automatically bundled with your other transaction(s) (6, below).
 Example of a staking transaction with Reveal PK message
Using the Ledger app with the CLI
You can use your Ledger to sign transactions from the Namada CLI.
Importing (deriving) your Ledger address
Before any other operations with the Ledger, we need to derive an address and public key and add them to the file system wallet under an alias for convenience. To derive your address using a Ledger:
Connect your device to your computer
Open the Namada app on your device
Derive your address / public key
This command will derive your address and public key and add them to your wallet under an alias of your choosing:
namadaw derive --use-device --alias $ALIASThe default derivation path is m/44'/877'/0'/0'/0. You can use the flag --hd-path to specify a different derivation path. Use namadaw derive --help for more information.
Confirm in wallet
List your wallet contents with:
namadaw listYou should see your address and pubic key listed under the $ALIAS you provided. Beside them should be the label (external) indicating that they are associated with a device.
Signing a transaction
Use the --use-device flag when you wish to sign a transaction using the Ledger. For example:
namadac transparent-transfer \
  --source $ALIAS \
  --target $DEST_ADDRESS \
  --token $TOKEN \
  --amount $AMOUNT \
  --use-device
When constructing the transfer, the CLI will check your wallet for the public key given under $ALIAS. You will then be prompted on the device to approve the transaction
Troubleshooting
As a first step when troubleshooting Ledger issues, make sure that you've updated your Ledger Live app and Ledger firmware to the latest versions. Additionally, check in the Ledger Live app catalog to make sure you have the latest version of the Namada app.
Some common errors you may encounter while using the Ledger with the Namada CLI:
-
Unable to connect to query address and public key from Ledger: Ledger | App Error: | 21781 [APDU_ERROR] Unknown
There is a USB connectivity issue; disconnecting and reconnecting the Ledger will often resolve this. -
The CLI panics with
Message: Failed to sign transactionor similar.
Make sure you're using the correct versions of both the Ledger app and Namada binaries -
The CLI panics with
Message: No signature could be produced for a transaction of type ...
Make sure the Ledger account has been properly added to your wallet.